Setting up a local PHP dev environment with WSL. Goodbye Vagrant!
Setting up a local PHP dev environment with WSL. Goodbye Vagrant!
WSL
For many years, developers who like Windows OS have lived on dual boots and virtual machines. Microsoft's introduction of Windows Subsystem for Linux (WSL) was one of the best moves the company made in an effort to make Windows a one stop for both personal computing and development. I live on both Windows and Linux and therefore to me, this was a long awaited feature.
WSL is disabled by default and can be enabled by going to "Add Optional Programs and Features" in Windows control panel or running the following command followed by a reboot.
Enable-WindowsOptionalFeature -Online -FeatureName Microsoft-Windows-Subsystem-Linux
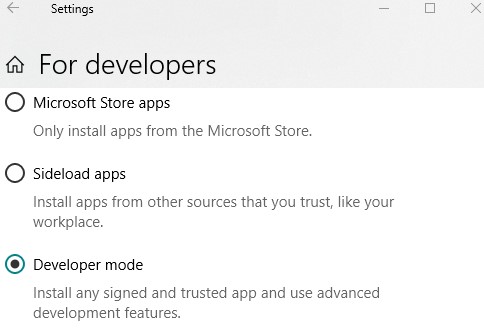
In settings, enable "Developer Mode" and then download your favorite distro from Microsoft Store. Once download is complete, open Command Prompt and type bash. Follow the prompts to create an account.

Developing PHP apps on Homestead
In the last few years, I have been developing on SP4 with high end specs and it has served me well. My environments ranged from WAMP servers to custom installations. It became tricky developing solely on Windows and deploying to Linux servers. I encountered random and unexpected behaviors in applications that consumed time to fix. I then settled on Homestead using Vagrant and Virtualbox. Virtualbox creates virtual network Ethernet cards that also became a pain when developing React Native apps using Expo. By default, Expo picked the Virtualbox Ethernet IP to serve the app, which obviously was not available to Android phone for testing. I had to disable those virtual cards every time I was developing using Expo.
When running the environment on top of using multiple tabs on Chrome, phpStorm, Git terminal and a few other programs on the host machine, CPU usage would spike and response on the idea would decrease.
Making the switch. Setting up my WSL environment and shelving Homestead.
After searching for a better and viable solution online, I came across Laragon, a portable isolated dev environment, I was sold... almost. I checked them out. Installed, configured, and up and running within a few minutes. When I launched it, I found that I had Commander terminal and Notepad++, all of which I didn't need since I use Sublime Text and VS Code for various quick code editing tasks. I liked the portability aspect and ability to create sites and setup hosts file automatically, and the small memory print. The problem was, I have to switch root directory on the program each time I was working on a different project and I didn't need many of the other features they have to offer. I spend a lot of time on the Linux terminal and thus I would still have to work with Laragon and Ubuntu in addition. So, why not make Ubuntu on WSL do the same work? A few minutes of initial setup, then replicate in future projects. WSL has extremely low memory usage and barely affects startup time on my machine. So in my process to customize WSL, this is what I came up with.
#!/bin/bash
sudo apt-get update
sudo apt-get install apache2 mysql-server php72-cli git

sudo service apache2 start
sudo service mysql start
sudo service php7.2-fpm start

#Mailhog -optional
git clone https://github.com/mailhog/MailHog.git mailhog
git clone https://github.com/mailhog/mhsendmail.git
sudo cp mailhog /usr/local/bin/mailhog
sudo cp mhsendmail /usr/local/bin/mhsendmail

# Create a script that will be run from Windows task scheduler
mkdir -p ~/.local/bin/

echo "service apache2 start" >> ~/.local/bin/mydev-env.sh
echo "service mysql start" >> ~/.local/bin/mydev-env.sh
# add more stuff here to run on startup

chmod +x ~/.local/bin/mydev-env.sh

ln -s /mnt/c/MyDevDir /var/www/
## add the following to your .bash_aliases and source it

function new-site(){
	# Get variables
	echo Enter Server Name EX. myproject.test
	read SERVER_NAME

	echo Enter Document Root /var/www/*myproject*
	read DOC_ROOT

	# Paths
	A2_SITES_AVAILABLE=/etc/apache2/sites-available/
	A2_SITES_ENABLED=/etc/apache2/sites-enabled/

	WIN_HOSTS=/mnt/c/Windows/System32/Drivers/etc/hosts

	THE_FILE=$SERVER_NAME.conf

	# Create the file
	touch $THE_FILE


	# add site configuration
	echo Writing configuration to $THE_FILE...
	printf "\n<VirtualHost *:80>" >> $THE_FILE
	printf "\n\tServerName $SERVER_NAME" >> $THE_FILE
	printf "\n\tServerAlias www.$SERVER_NAME" >> $THE_FILE
	printf "\n\tDocumentRoot /var/www/$DOC_ROOT" >> $THE_FILE

	printf "\n\n\tServerAdmin webmaster@localhost" >> $THE_FILE
	printf "\n\tLogLevel debug" >> $THE_FILE

	printf "\n\n\tErrorLog ${APACHE_LOG_DIR}/error.log" >> $THE_FILE
	printf "\n\tCustomLog ${APACHE_LOG_DIR}/access.log combined" >> $THE_FILE

	printf "\n</VirtualHost>\n" >> $THE_FILE

	# copy the file to available sites
	echo  Copying config file to available sites...
	sudo cp $THE_FILE $A2_SITES_AVAILABLE &&

	# move the file to enabled sites
	echo Moving config file to enabled sites...
	sudo mv $THE_FILE $A2_SITES_ENABLED

	# restart Apache server
	echo Restarting server
	sudo service apache2 reload

	# add the site to Windows hosts file
	echo Adding site to Windows hosts...
	printf "\n127.0.0.1\t$SERVER_NAME" >> $WIN_HOSTS
}
https://gist.github.com/jgmuchiri/a3e0c6bb5340dad57dc31e3a6bea3f9d
Next time you need to create a new site, simply open Ubuntu or Bash from your Windows host as administrator, type new-site and hit enter. Answer the 2 prompts (site domain e.g. mysite.test and document root e.g. mylaravelsite/public) and you are all set.
What this code does.
- Create an apache2 site configuration
- Set the site's document root
- Add the site to your Windows machine hosts file
- Restarts your Apache server
You should now see the site load on your browser at http://mysite.test
Since you cannot run a 'true' service on startup in WSL, you can use this workaround to run a script when the machine boots.
mkdir -p ~/.local/bin/
echo "service apache2 start" >> ~/.local/bin/mydev-env.sh
echo "service mysql start" >> ~/.local/bin/mydev-env.sh
chmod +x ~/.local/bin/mydev-env.sh
Then, allow your WSL account to run root commands without password
sudo visudo

john ALL=(root) NOPASSWD: /home/john/.local/bin/mydev-env.sh
Create a login script that runs this command
bash.exe -c 'sudo ~/.local/bin/mydev-env.sh'Or simply create as scheduled task using this command
SCHTASKS /Create /SC ONLOGON /TN "Start My DEV Env" /TR "bash.exe -c 'sudo ~/.local/bin/mydev-env.sh'"To run mailhog, you can either type mailhog on the terminal or specify ips and ports.
mailhog \
  -api-bind-addr 127.0.0.1:8025 \
  -ui-bind-addr 127.0.0.1:8025 \
  -smtp-bind-addr 127.0.0.1:1025
Also specify mhsendmail in your php.ini
sendmail_path = /usr/local/bin/mhsendmailYour Windows mount directory can be anywhere. Just change the ln command to create the symbolic links to the specific directories.
Remember to backup your work often. You never know when lightening may strike! You can backup your personal files to a local external backup media and your code to a remote repository. Github, Gitlab and Bitbucket are some of the services I regularly use.

Happy coding!
